NUS mSurvey - Instructions on use
NUS Mobile Team
![]()
The NUS Survey App is written for Apple’s iPhone to record survey results and export them to your computer for further analysis. It does not require Internet Connection while you are conducting the survey interviews. The results will be stored on the iPhone until you connect it to your computer via iTunes to upload the results to your computer. You can then use Excel to analysis the results collected.
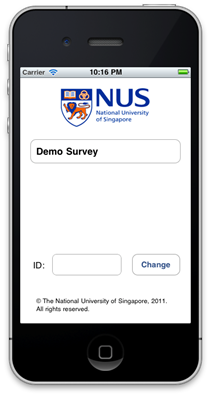
Start up Screen
- 1) Enter the Interviewer ID. The ID will form part of the survey results file name to identify the interviewer.
- 2) Tap on the survey that you want to conduct. In this case, only the Demo Survey is available for selection.
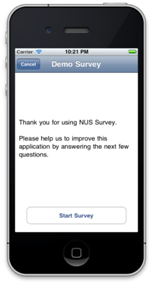
Introduction Screen
This screen will show the important messages that the interviewer should explain to the interviewee before the survey starts.
An example of an Agree/Disagree (or Yes/No) question

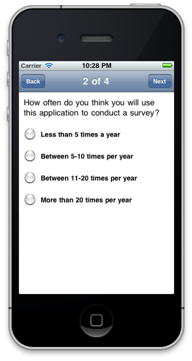
An example of a Radio button based question (interviewee can only choose 1 option)
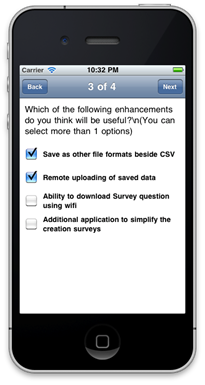
An example of a checkbox question (interviewee can choose more than 1 option)
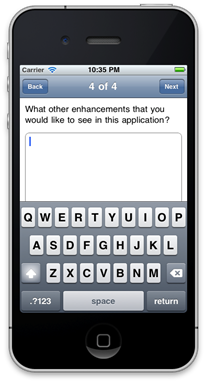
An example of an open-ended question (interviewee can express their views or answers freely)
Uploading the Survey questions and downloading the Survey Results
To upload your surveys, you will need to connect your iPhone to your iTunes.
Under Device, select your iPhone. Click on “Apps” and select “NUS Survey” under File Sharing section. Click on “Add…” button to upload the survey question file and “Save as…” to download the survey results.

Note that you will need to name the survey file as “Survey.plist.”
The survey results will be stored as <ID>_<Date>.csv (comma separated format).
<ID> - User ID that was entered at the Startup screen
<Date> - Date of survey (in yyyy-mm-dd format).
If you have modified the survey plist and the new version does not show up in the iOS device after loading, you will need to reload the application using the Fast App Switcher. Here are the steps:
- 1) Activate the Fast App Switcher, double click the home button on the iOS device. The interface will slide up and reveal a second dock-like set of app icons running in the background.
- 2) Locate the app by swiping left or right to locate the NUS mSurvey App icon.
- 3) Tap and hold the App icon until the icons begin to jingle
- 4) Tap on the minus symbol (-) at the top left corner to force quit the app
- 5) Click on the home button twice to return to normal operating mode
- 6) Finally, click on NUS mSurvey Icon to re-start the application
Creating a customized survey
To create a customized survey, you will need to edit the NUS Survey property list file (Survey.plist). The easiest way to edit the file is to use the Property List Editor that is bundled with XCode. Alternatively, you can use any XML editor to edit the file.
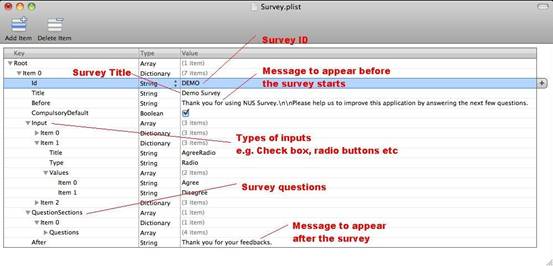
As seen in diagram below, a typical survey is divided into various parts:
Id |
: |
Survey Identification Code. |
Title |
: |
The survey title to appear in the startup screen for the interviewer to select. |
Before |
: |
The message to be displayed to the interviewer before the survey starts (e.g. explain the purpose of the survey, how long does it takes etc). |
CompulsoryDefault |
: |
Default setting on whether the survey question is compulsory. It can be overwritten in the survey question section. |
Input |
: |
The types of options that the user can select in the survey. The same input type can be used for more than one question (e.g. Agree, Disagree). |
QuestionSections |
: |
Survey Questions |
After |
: |
Message to be displayed to the interviewer after the survey ends (e.g. Thanks the interviewee for their time etc) |
General Components of the Survey plist
Creating a Checkbox based Survey Question
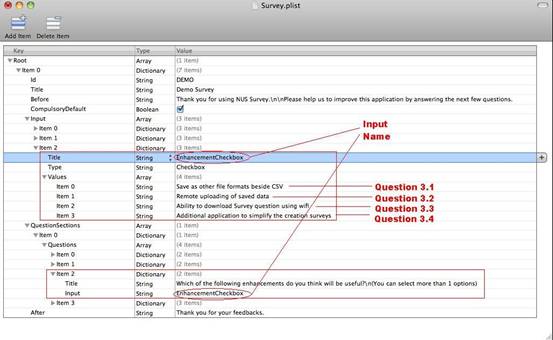
Steps:
- 1) Create an array under Input
- 2) Name the array as EnhancementCheckbox
- 3) Specify the input type as Checkbox
- 4) Create the checkboxes available for the user to mark in a new array of strings
- 5) Under the Questions group, create a new Question.
- 6) Enter the survey question as the Title
- 7) Specify the input as EnhancementCheckbox (or any other name that you specify in Step 2).
Note:
- i) Item 0 in the array of checkboxes will correspond to Question X.1 in the survey results (where X is the survey question number).
- ii)Survey result will show “Y” if the checkbox is checked and “N” if the checkbox is not checked.
Creating an Radio-Button based Survey Question
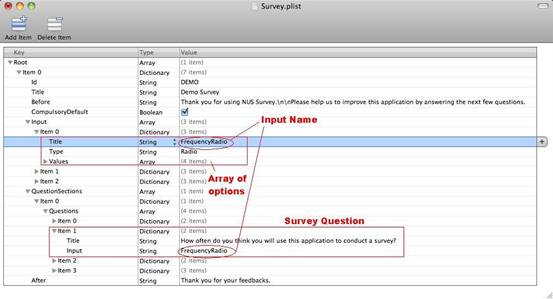
Steps:
- 1) Create an array under Input
- 2) Name the array as FrequencyRadio
- 3) Specify the input type as Radio
- 4) Create the options available for the user to choose in a new array of strings
- 5) Under the Questions group, create a new Question.
- 6) Enter the survey question as the Title
- 7) Specify the input as FrequencyRadio (or any other name that you specify in Step 2).
Note:
- i) Item 0 in the array of Options will correspond to Option 1 in the survey results.
- ii)You can create generic group of Inputs such as (Yes, No) to that they can be used in more than 1 survey questions.
Creating an Open Survey Question (Text input)
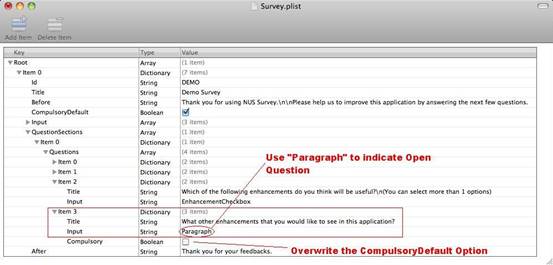
Steps:
- 1) Under the Questions group, create a new Question.
- 2) Enter the survey question as the Title
- 3) Specify the input as Paragraph
- 4) Create an item - Compulsory. Leave it unchecked to overwrite the default CompulsoryDefault setting. In this case, user need not answer this question.
Survey Data Analysis
After the data is collected, you can connect the iOS device to a PC with iTunes to retrieve the survey results. The results are stored in Comma Separated values file format (csv). You can use spreadsheet tools like Excel to manipulate the data in columnar format.

Notes:
- i) The result of an option button based question will be stored as an integer. It corresponds with Item (X-1) in the plist (e.g. if the result indicates ‘1’, it means that the user has selected Item 0 in the plist Input group).
- ii)For Checkbox survey questions, there will be multiple header fields for the results. QX.1 will correspond to Item 0 in the plist Input group. The result will be ‘Y’ if the user checked the box and ‘N’ if the box is left blank.
- Please click here to download a sample plist file.
- Please click here to download the above set of instructions in PDF format.
Terms of Use | Privacy | Non-discrimination